everything you need to know about frost protection ❄️
first freeze projected this week in NC - a month early
Row covers. Frost cloth. Hoop supports. Frost blankets. Freeze fabric. Floating covers. Low tunnel. Cold frame. Hoop houses.
When I started trying to figure out how to add frost protection to my garden a few years ago, it was exasperating. I watched what seemed like 100 youtube videos and read a thousand articles, and made at least 6 trips to Lowes. To this day, I don’t know why it feels like the hardest garden thing I’ve ever done (and continue to do) but I have definitely trial-and-errored my way through knowing what works for me, and what isn’t wildly expensive.
Below is my personal bible for setting up frost protection. There are a hundred other ways, but these are mine, and I hope it is helpful for those of you trying to extend your growing season or protect your pride-and-joy plants that you’ve been collecting and really aren’t meant to survive deep freezes. :)
I have not written about cold frames, greenhouses, or cloches — all of which are incredible long-term solutions that Nikki Jabbour covers in detail in The Year Round Gardener; a book I highly recommend.
🚨 PS: We are predicted to drop to 30° next Wednesday night in the Triad. This is an entire month early, so please get your stuff NOW and watch your weather closely. If you are local and panicking, DM me on IG and I’ll do my best to hook you up. 🚨
Low Covers vs Hoop/High Covers
This is my own fake language that I am using for the two styles of protection in my garden. Hoops (Left image) are about 2-3’ off the ground, for taller plants like kale, leeks, bush peas, broccoli, etc. Low covers (Right image) are only about 12-18” off the ground, and meant to cover small crops like lettuces, spinach, root vegetables, bok choy, herbs.
👉🏼 ATTN: It’s important for fabric to not touch the plant 👈🏼
Frost Protection vs Overwintering
For the casual gardener, having an easy frost protection solution is the simple way to keep a couple crops available to harvest for 3-6 weeks longer than usual by putting a blanket-type material over them at night when temperatures slightly get below 32-34°. For example, in North Carolina, a standard AG-19 or all-purpose garden blanket will usually keep your greens alive through Christmas unless we’re having an extremely early cold winter.
For the more enthusiastic gardener, overwintering materials are more permanent solutions for growing year round. This means sturdier supports and heavier-weight cloths that will not only protect plants from dips below freezing, but insulate them throughout the day and night — giving them a warmer growing environment and keeping temperatures as much as 10° warmer at night. This means if it’s 18° at night, with AG-70, your plants will be kept at 28° — a temperature suitable for thick-leaved cold season crops like chijimisai, tatsoi, and all the brassicas.
When you purchase frost protection cloth (Agribon+ is the best), make sure you look at how many degrees it’s “adding” to your plant environment.
👉🏼 ATTN: If you’re buying a product that doesn’t list it, skip it or assume that it’s only 2-4° / replacement for AG-19. 👈🏼

A Quality + Spacing Note
The quality needed for your supports are dependent on the severity of weather in your location. North Carolina has moderate winters, but I’ve been surprised by the damage a hard wind or ice-rain can do. In general, the taller your support, the heavier gauge / sturdier material you will need — and the lower to the ground, the more DIY options you have. Northern climates with heavy snows will want solid structures for overwintering at all sizes.
👉🏼 ATTN: Placing your hoops/supports closer together will help with sturdiness. They should always be at least within 3’ of each other, and you could put as close as 2’ together. 👈🏼
DIY or pre-made?
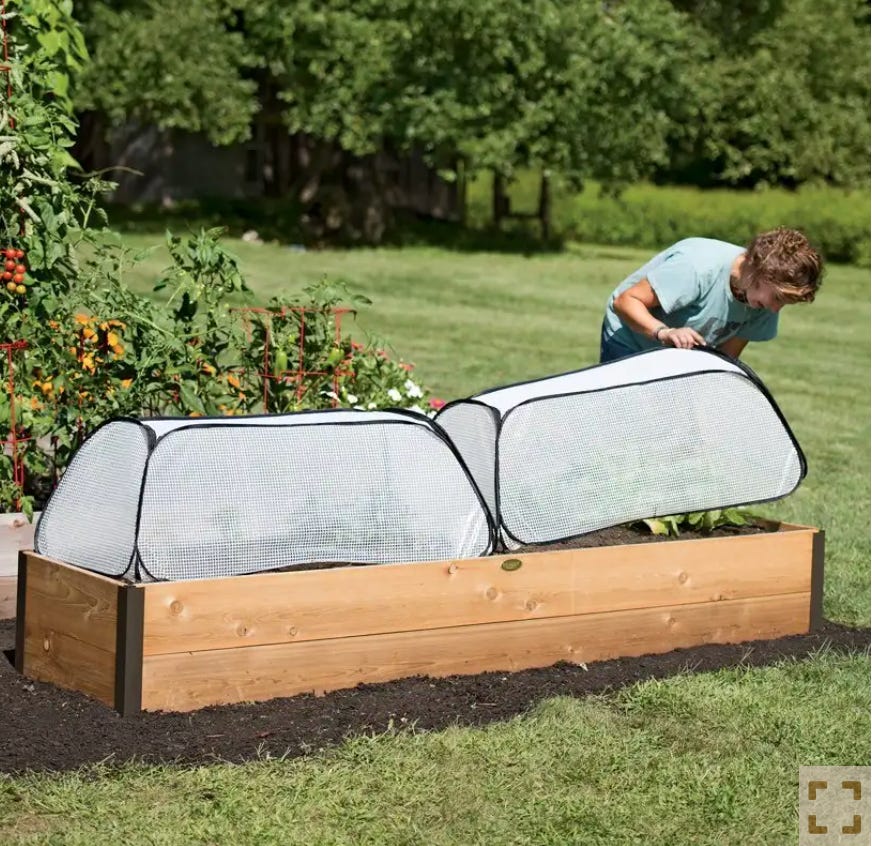
I use both. If you have several large beds, DIY is the best option. If you want to overwinter and not spend $300+, it’s a must. If you have smaller beds (like a 4x4 or 3x6) or only a few areas in a larger bed that need protection, my favorite product is the Row Shelter from Gardeners.com. They don’t guarantee any specific degree of protection, but they provide at least 4° from my experience — they’re collapsible to store in the summer and double as bug protection in the spring/fall.
**LOCALS: I just ordered 7 extras in a panic and you can pick them up when they arrive.**
HOW TO UNDERSTAND SIZING
You don’t have to multiply by π (pi) everytime, but it helps! I usually short hand and add up right side height + width + left side height , and then subtract a tidge because it’s a circle and not a rectangle. For example, I would have done 6+3+3-2= 10’, but this is a pro/sloppy move.
SUPPORT OPTIONS
I currently use PVC for my tall hoops and ladder mesh for my low ones. I am planning on buying support wire in the future.
(1) 8” 9 Gauge Ladder Mesh — $5/ea — Home Depot / Lowes
Sold in 10’ pieces, I use it for two very low 5’ supports, or cut one down for a ~7’ support. This material is not strong enough for a 10’ arch; they will bow over and not hold any weight if you get ice/snow/wind. You will need bolt cutters or something that cuts a 9 gauge wire.
(2) Coiled #9 Support Wire — $36 @ Johnnys
This is a great alternative for the above, especially if you have time to order online and are doing lots of low hoops. 60’ can be cut into whatever size you need for the width of your rows or beds. Also 9 gauge, so will need a tool to cut. This works great.
(3) 1/2” 100 PSI White PVC — $10/each — Home Depot / Lowes
I use PVC for my taller hoops! Make sure you get 100 PSI, usually in the electrical aisle. This is sold in 10’ pieces and is bendy enough to bend into a hoop. Yes, I’ve bought other PSIs and they too thick to bend; it was a real bummer. Note: If your soil is soft, you can usually shove these 6-10” deep into the ground and get them steady. If not, get 1/4” rebar (in the masonry section) and use a mallet to hammer them in first, and then slip the PVC over it to be more secure.
FABRIC
I recommend Agribon+ for it’s durability. Choose your weight based on your location and needs. Trick: You can double up on a fabric! Two layers of 4° insulation = 8° insulation!
Agribon is the standard for farming and can usually be bought in 50’, 100’, and 250’ lengths. Split a roll with a friend if this is too much for you, or store it for future years. I purchase from Johnny’s, but since I needed immediate delivery by next weeks' frost, I just purchased from Plantonix on Amazon.
If you have only low covers, you can buy the 83” wide fabric. If you have low and tall, you can purchase 10’ wide fabric for the tall covers, and cut it down or fold in half for low rows.
83” (7’) width — If 2’ rows, this gives you ~2.5’ height. 3’ rows? 2’ height.
10’ width — If 4’ beds, gives you ~3-4’ height.
CLIPS
Lots of options for attaching your fabric to your supports! Here are some!
PVC clips for 1/2”, 3/4”, or 1” piping.
Greenhouse clamps; fits 1/2” PVC.
Mini Metal Clips; fits Ladder Mesh or 9-gauge wire
Stainless Steel Clips; flexible and fits up to 1’ PVC/material
Good luck, comment with questions, share with a friend, and cross your fingers the freeze holds off. 🤞🏻
Lauren
“No destination is really known until you arrive, and then it becomes merely a point along the way - a vague place rarely planned for, simply the start of another adventure. The only thing to do is be happy with the outcome, whatever it is.
I've had some rocky paths and dead ends, and decisions that led to disaster, and others that led to love and passion and poetry, to excitement and adventure. What could have been has never been, and never will be. There are no rules, and nothing planned by humans is ever planned that way again. The way is vague and unknowable.” ― Marc Hamer, Seed to Dust: A Gardener's Story


